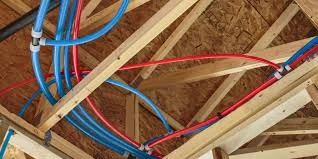
PEX pipes DIN 16892 have become a go-to choice for modern plumbing due to their flexibility and resistance to scaling and corrosion. However, the success of your PEX installation hinges on how well you connect the pipes. Proper connections ensure that your plumbing system is leak-proof and efficient. Here, I’ll share my pro-tips to help you master PEX Pipe connections, whether you’re a professional or a DIYer.
Essential Tools and Materials
Before diving into the connection process, make sure you have all the necessary tools and materials:
PEX Pipes and Fittings
PEX Pipe DIN 16892 come in different sizes and types, including PEX-A, PEX-B, and PEX-C. Choose the type that suits your needs and ensure you have compatible fittings.
Crimp Tools
For crimp connections, you’ll need a quality crimp tool. This tool compresses a metal ring onto the PEX pipe and fitting to create a secure connection.
Pipe Cutters
A sharp pipe cutter is essential for making clean, straight cuts on PEX pipes. Avoid using saws or other tools that can cause uneven edges.
Deburring Tools
Deburring tools smooth out any rough edges on the pipe ends, preventing damage to fittings and ensuring a proper seal.
Pipe Supports and Brackets
Support and bracket systems keep your pipes in place and prevent them from moving, which can help reduce wear and tear over time.
Preparation Steps
Proper preparation is key to a successful PEX pipe connection:
Measuring and Cutting PEX Pipes
Measure your pipes accurately and cut them with a pipe cutter. Ensure the cut is straight to facilitate a good fit with the fittings.
Deburring Pipe Ends
After cutting, use a deburring tool to remove any rough edges from the pipe ends. This helps to avoid damaging the fittings and ensures a tight seal.
Selecting the Right Fittings
Choose fittings that match the size and type of your PEX pipes DIN 16892. Using incompatible fittings can lead to leaks and other issues.
Connection Methods
There are several methods to connect PEX pipes DIN 16892, each with its own set of techniques and considerations:
Crimping
Step-by-Step Guide
- Prepare the Pipe: Cut the pipe to the desired length and deburr the edges.
- Insert the Fitting: Slide the fitting into the pipe until it reaches the stop.
- Crimp the Connection: Place a crimp ring over the pipe and fitting, then use the crimp tool to compress the ring evenly around the pipe.
Common Mistakes
- Inconsistent Crimping: Ensure the crimp tool is positioned correctly and that the crimp is even around the pipe.
- Over-Crimping: Applying too much pressure can damage the pipe or fitting.
Expansion
Step-by-Step Guide
- Prepare the Pipe: Cut and deburr the pipe as needed.
- Expand the Pipe: Use an expansion tool to enlarge the end of the pipe.
- Insert the Fitting: Slide the fitting into the expanded pipe.
- Allow to Set: The pipe will contract around the fitting as it cools, creating a secure connection.
Common Mistakes
- Improper Expansion: Ensure the pipe is expanded sufficiently for a snug fit with the fitting.
- Not Allowing Enough Time: Allow adequate time for the pipe to contract around the fitting.
Push-to-Connect
Step-by-Step Guide
- Prepare the Pipe: Cut and deburr the pipe ends.
- Insert the Pipe: Push the pipe into the fitting until it reaches the stop.
- Verify Connection: Check that the pipe is fully inserted and the connection is secure.
Common Mistakes
- Not Fully Inserting the Pipe: Ensure the pipe is pushed all the way into the fitting.
- Using Damaged Pipes: Check for any damage to the pipe ends that could prevent a proper seal.
Pro-Tips for a Successful Connection

Ensuring Proper Alignment
Align the pipe and fitting correctly before making the connection. Misalignment can lead to leaks and inefficient connections.
Avoiding Common Pitfalls
- Do Not Over-Apply Force: Whether crimping, expanding, or pushing, avoid excessive force that can damage the pipes or fittings.
- Check Compatibility: Ensure that all components are compatible with each other to prevent leaks.
Checking for Leaks
After making your connections, turn on the water supply and check for leaks. Address any issues immediately to avoid water damage.
Maintenance and Troubleshooting
Routine Inspections
Regularly inspect your PEX plumbing system for any signs of wear or leaks. Early detection can prevent larger issues down the line.
Common Issues and Fixes
- Leaks: Tighten connections or replace fittings if necessary.
- Pipe Damage: Replace any damaged sections of pipe to prevent further issues.
When to Seek Professional Help
If you encounter persistent problems or are unsure about your connections, consult a professional plumber. They can provide expert advice and ensure your system is functioning correctly.
Frequently Asked Questions (FAQs)
How do I know if my PEX connections are secure?
Check for any visible leaks and ensure that connections are properly aligned and fully inserted.
Can I use PEX pipes for both hot and cold water?
Yes, PEX pipes DIN 16892 are suitable for both hot and cold water applications.
What should I do if a fitting leaks?
Check the connection for proper alignment and re-crimp or re-install the fitting if necessary.
Are there special considerations for PEX in freezing temperatures?
Insulate PEX pipes to prevent freezing and potential damage. PEX is more flexible than traditional pipes but still requires protection in extreme conditions.
How often should I inspect my PEX plumbing system?
Regular inspections are recommended at least once a year or more frequently if you notice any issues.
Conclusion
Connecting PEX Pipes DIN 16892 might seem straightforward, but attention to detail and proper techniques are essential for a successful installation. By following these pro-tips and understanding the connection methods, you can ensure your PEX plumbing system is reliable, efficient, and free from leaks. Whether you’re tackling a small repair or a major installation, these tips will help you achieve professional results.