Introduce PPR Pipe
Polypropylene Random Copolymer (PPR) pipes are becoming increasingly popular for both residential and commercial plumbing systems due to their durability, cost-effectiveness, and ease of installation. PPR Pipe offer numerous advantages over traditional materials such as copper or PVC, including excellent corrosion resistance, high temperature tolerance, and a long service life. However, despite their many benefits, improper installation or mistakes during the fitting process can lead to costly repairs, water damage, and system inefficiencies.
In this article, we will discuss the common mistakes made during PPR pipe fitting installations and provide tips on how to avoid them. Whether you’re a professional plumber or a DIY enthusiast, understanding these pitfalls will help you ensure that your PPR pipe fittings perform optimally for years to come.
Understanding PPR Pipe Fittings
Before diving into the common mistakes, it’s important to first understand PPR pipes and fittings, and why they’re such a popular choice for modern plumbing systems.
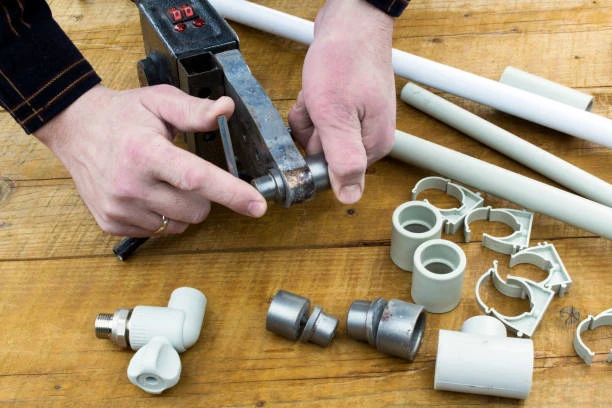
PPR Pipe are made from polypropylene, a high-quality thermoplastic polymer that provides durability, flexibility, and resistance to corrosion. Pipe fittings are used to connect different sections of the pipe, including elbows, tees, couplings, and reducers, and can be easily fused together using heat welding or heat fusion.
PPR Pipes and fittings are ideal for hot and cold water systems, heating installations, and even industrial applications. However, installing PPR pipes and fittings requires precision and care to avoid potential problems.
Common PPR Pipe Fitting Mistakes and How to Avoid Them
While PPR pipes and fittings are relatively easy to install, certain mistakes can compromise the effectiveness of the system. Below are some of the most common mistakes made during PPR pipe fitting installations and how to avoid them.
1. Using the Wrong Tools for PPR Pipe Fittings
One of the most critical steps in ensuring a successful PPR pipe installation is using the right tools. Using improper tools can lead to poor connections, leaks, or even damage to the PPR pipe and fittings.
Mistake:
- Using a hacksaw or a regular pipe cutter instead of a PPR-specific pipe cutter.
- Not using a pipe deburring tool after cutting the pipe, which can leave rough edges and prevent proper sealing.
Solution:
- Always use a PPR pipe cutter designed for cutting thermoplastic pipes. This tool ensures clean, straight cuts that are crucial for proper fitting connections.
- After cutting the pipe, use a deburring tool to remove any rough edges or burrs left behind. This step ensures that the fitting can be securely fused without any obstruction, preventing leaks.
2. Incorrect Pipe Measurements
Accurate pipe measurements are essential for creating a secure, leak-free installation. Failing to measure the length of the pipes correctly can lead to gaps, misalignments, and other issues.
Mistake:
- Not measuring the pipe length properly or failing to leave enough room for fitting connections.
- Misplacing or skipping key measurements when installing tees, elbows, or reducers.
Solution:
- Always use a measuring tape to determine the precise length of the pipes you need. Double-check your measurements before making any cuts.
- When installing fittings, leave enough space for proper connection, ensuring that the pipes fit snugly into the fittings without causing strain or bending.
3. Overheating or Underheating the Pipe During Fusion
Heat fusion is the method used to join PPR pipes and fittings. However, overheating or underheating the pipe and fitting during fusion can result in weak joints, leaks, or poor performance.
Mistake:
- Using a fusion welding machine that isn’t properly calibrated or trying to fuse the pipe and fitting at the wrong temperature.
- Overheating the pipe and fitting, which can cause the material to warp or degrade.
Solution:
- Follow the manufacturer’s guidelines for the correct fusion temperature, typically between 250°C and 270°C (482°F to 518°F), depending on the size of the pipe and fitting.
- Ensure that the fusion welding machine is well-maintained and properly calibrated to avoid overheating or underheating the pipe and fitting.
- Perform a test weld on scrap pieces to check the settings before proceeding with the actual installation.

4. Failing to Clean the Pipe and Fitting Before Fusion
For a strong and leak-free connection, both the PPR pipe and fitting must be clean and free of dirt, oil, grease, or debris. Any contamination on the surfaces can prevent proper fusion and lead to poor joint integrity.
Mistake:
- Not cleaning the pipe and fitting thoroughly before performing the heat fusion process.
- Using dirty cloths or hands to handle the pipes, which can transfer contaminants onto the surfaces.
Solution:
- Use a clean cloth to wipe both the pipe and the fitting before fusion. Make sure that no dirt, dust, or grease is present on the surfaces.
- Keep your work area clean and avoid handling the pipe and fitting with dirty hands.
- For added protection, use a cleaning solvent designed for PPR pipes to remove stubborn contaminants if needed.
5. Inadequate Pipe Support
Proper pipe support is essential to maintain the integrity of the system, prevent sagging, and avoid stress on the fittings. Lack of pipe support can lead to leaks, damage, and early system failure.
Mistake:
- Not securing the pipes with adequate pipe brackets or clamps, which can cause the pipes to sag, bend, or shift.
- Installing PPR pipes too tightly against walls or other surfaces without leaving room for expansion.
Solution:
- Install pipe brackets or clamps at regular intervals to support the pipes and prevent them from sagging or shifting. Follow the manufacturer’s guidelines for the spacing of these supports.
- Allow enough room for the pipes to expand or contract with temperature changes. This is especially important when installing pipes in areas where hot water is used.
6. Using the Wrong Fittings for the Job
Using the wrong type or size of PPR pipe fitting can cause misalignments, leaks, and system inefficiency. This is especially important when working with larger or custom installations.
Mistake:
- Using incompatible or incorrectly sized fittings, which can result in poor connections.
- Mixing different types of materials, such as using PPR fittings with PVC or metal pipes, which can cause issues with heat and pressure.
Solution:
- Always ensure that the PPR fittings match the diameter and specifications of the pipe you are using. Check that both the pipe and fittings are compatible.
- Use only PPR fittings with PPR pipes, and avoid mixing materials that may not fuse correctly.
- For special installations, consider using PPR transition fittings designed for compatibility with other materials (e.g., copper or PVC).
7. Rushing the Installation Process
One of the biggest mistakes you can make when installing PPR pipe fittings is rushing through the process. Taking shortcuts can lead to errors, improper fittings, and leaks.
Mistake:
- Rushing the fusion process or not allowing enough time for the pipe and fitting to cool after fusion.
- Cutting corners by skipping steps, such as not deburring the pipe or not properly measuring the pipe lengths.
Solution:
- Take your time and follow each step carefully. Don’t rush through the cutting, cleaning, welding, or installation processes.
- Allow adequate cooling time after heat fusion to ensure that the joint is fully set before applying pressure.
8. Ignoring Leak Testing
After installing the PPR pipe fittings, it’s essential to test the system for leaks before putting it into service. Failure to do so can result in undetected leaks that waste water and cause long-term damage.
Mistake:
- Skipping the leak testing phase after completing the installation.
- Assuming the installation is flawless without inspecting all joints and connections.
Solution:
- Perform a visual inspection of all fittings and joints after installation to ensure that everything is properly aligned and secure.
- Run a pressure test to check for leaks. If any leaks are detected, take the necessary steps to repair them before using the system.
Conclusion
Avoiding these common mistakes during PPR pipe fitting installation can help you achieve a leak-free, durable, and efficient plumbing system. By using the right tools, carefully following the proper procedures, and taking your time to ensure accuracy, you can install PPR pipes and fittings that will last for years without problems.
Whether you’re a seasoned plumber or a DIYer, always take the necessary precautions and double-check your work to avoid costly repairs and system failures. PPR pipes, when installed correctly, offer long-lasting performance and excellent value for your plumbing system.
Frequently Asked Questions (FAQs)
1. What is the best tool to cut PPR pipes?
The best tool for cutting PPR pipes is a PPR pipe cutter, which provides clean, straight cuts without causing damage to the pipe. Avoid using hacksaws or other general tools, as they can create jagged edges.
2. How do I know if the PPR pipe fitting is installed correctly?
To ensure the fitting is installed correctly, check that the pipe is properly aligned and securely fused to the fitting. Perform a visual inspection and a pressure test to ensure there are no leaks or weak joints.
3. Can PPR pipes be used for both hot and cold water systems?
Yes, PPR pipes are ideal for both hot and cold water systems. They can withstand temperatures ranging from -10°C to 95°C, making them versatile for a variety of plumbing applications.
4. How do I prevent leaks in my PPR pipe fittings?
To prevent leaks, make sure to properly measure, clean, and fuse the pipes and fittings. Use the correct tools, leave enough space for pipe expansion, and always perform leak tests after installation.
5. Can PPR pipes be installed outside?
Yes, PPR pipes can be installed outdoors, but they must be protected from extreme weather conditions and UV exposure. Consider using insulation or protective coverings to prolong the life of the pipes when installed in exposed outdoor areas.


